
Kebonnixs 12 Egg Incubator Incubator is packed with features that’ll help you hatch and nurture your eggs with ease. In this handy guide, we’ll take you through the setup, operation, maintenance, and troubleshooting of the incubator, ensuring you have a smooth and successful incubation experience.
Before we guide you on using the Kebonnixs 12 Egg Incubator, We want you to know the features and the new technology integrated into this successful incubator
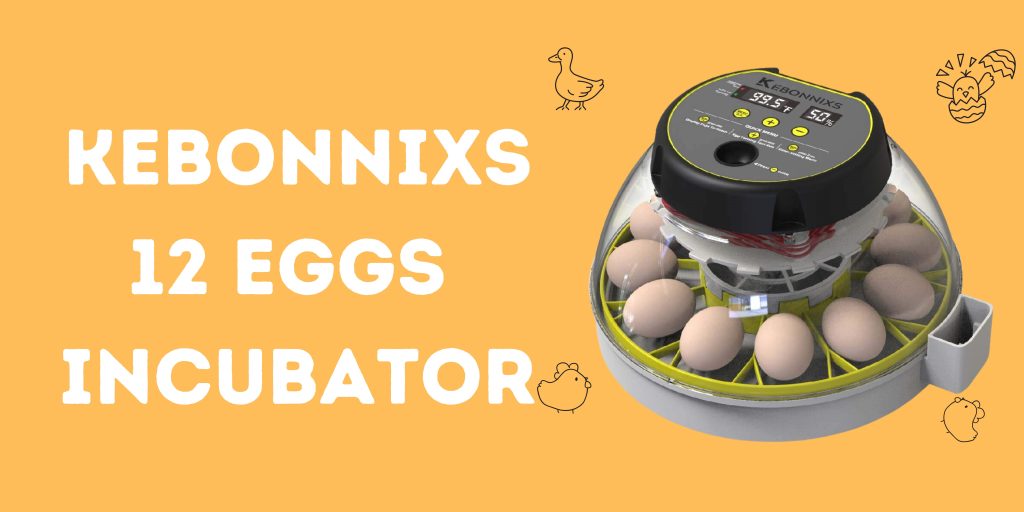
Kebonnixs 12 Egg Incubator Features
The Kebonnixs 12 Egg Incubator offers several key features that contribute to its effectiveness and convenience:
Stable Temperature
Thanks to the induced airflow system and circulating fan, the incubator maintains a consistent temperature throughout, ensuring your eggs get the ideal conditions for hatching.
Display Humidity Level
Monitoring humidity is a breeze with the built-in hygrometer. You won’t need any extra devices to keep an eye on the humidity level inside the incubator.
Built-in Egg Candler
The incubator comes with a built-in egg candler, so you can easily observe the development of your eggs without needing a separate candler.
External Water Top-Up
Adding water to the incubator is super convenient. You can do it without opening the lid, minimizing temperature fluctuations and keeping a stable environment for your eggs.
Auto-Stop Egg Turner
The automatic egg turner is a neat feature that stops rotating the eggs three days before they’re expected to hatch. This prevents excessive turning and ensures the best conditions for your little ones.
How to Use Kebonnixs 12 Egg Incubator
By reading our Kebonnix Installation, Setup and Operational guide, Our experts at Incubator Guy make sure to give you all the information required for all our new Kebonnixs customers so they can successfully hatch the chicks.
Installation and Setup
Now, let’s talk about the installation and setup process. Just follow these steps:
- Connect the power adapter to the 12V power input located on the bottom of the incubator base and the power connector on the back of the control box. Make sure it’s securely connected.
- Find a well-ventilated area away from direct sunlight, drafts, and extreme temperatures to place your incubator. It’s crucial to keep it stable, so make sure to position it on a flat and even surface.
Operating Instructions
To effectively use the Kebonnixs 12 Egg Incubator, follow these instructions:
- Double-check that the incubator is properly connected to the power supply.
- Press the power button on the control box to turn on the incubator.
- Adjust the temperature control settings to the desired incubation temperature.
- Keep an eye on the humidity level using the built-in hygrometer. You can maintain the desired humidity by filling the external water top-up reservoir as needed.
- The automatic egg turner will gently rotate the eggs every 60 minutes until three days before the expected hatch day. Use the built-in egg candler to observe the eggs’ development.
For more detailed instructions on temperature and humidity control, refer to the manual that comes with your incubator.
Maintenance and Cleaning Guide
Maintenance and cleaning are crucial for optimal performance and hygiene. Here’s what you need to know:
- Always unplug the power adapter before cleaning the incubator.
- Use a soft, damp cloth to clean both the interior and exterior surfaces of the incubator. Avoid using abrasive cleaners or solvents that may damage it.
- Regularly clean the egg turner, water reservoir, and egg trays for optimal performance. Make sure to gently remove the eggs from the egg turner before cleaning.
- Clean the egg turner using a mild soap solution, ensuring all debris and residue are removed. Rinse it thoroughly and let it dry completely before reinserting the eggs.
- Wash the water reservoir with mild soap and water, removing any buildup or impurities. Rinse it thoroughly and let it dry completely before refilling it with fresh water.
- Wipe the exterior surfaces of the incubator with a soft, damp cloth to remove dust or dirt.
- Regularly inspect the power adapter and its connections for any signs of damage or wear. If you notice any issues, replace the damaged components immediately to ensure the safe and reliable operation of your incubator.
It’s recommended to clean the incubator after each hatch cycle to maintain optimal cleanliness and performance. By regularly cleaning and maintaining the incubator, you can prevent the buildup of bacteria or contaminants that could negatively impact the hatching process.
Troubleshooting
Now, let’s talk about troubleshooting. If you come across any issues with your Kebonnixs 12 Egg Incubator, refer to the troubleshooting section in the manual. Here are a few common troubleshooting tips to get you started:
- Ensure that the power adapter is securely connected to a power source and to the incubator itself. Sometimes, a loose connection can cause power supply problems.
- Double-check that the temperature and humidity settings are correctly adjusted according to the requirements of the eggs you’re incubating.
- Verify that the fan and other components are functioning properly. If you notice any unusual noises or malfunctions, it’s important to address them promptly.
If you continue to experience issues or if the problem persists, don’t hesitate to contact Kebonnixs customer support for further assistance. They’ll be able to guide you through more specific troubleshooting steps or arrange for necessary repairs or replacements.
Regarding warranty information, the Kebonnixs 12 Egg Incubator comes with a limited warranty. It’s important to keep your proof of purchase handy, as it may be required for warranty service. For specific details regarding coverage and terms, refer to the warranty card included with the product.
Conclusion
using the Kebonnixs 12 Egg Incubator is a convenient and reliable way to successfully hatch your eggs. By following the installation, operating, maintenance, and troubleshooting instructions provided in this guide, you can ensure the optimal conditions for your eggs’ development. Enjoy the journey of incubation and the rewarding experience of witnessing new life emerge from your precious eggs. Happy hatching!